Epoxy flooring transforms your garage into a clean, professional space. However, smooth epoxy surfaces can become slippery when wet. Adding anti slip additives solves this problem while maintaining the floor’s attractive appearance. This guide walks you through the entire process from preparation to final touches.
Understanding Epoxy Flooring and Safety Requirements
Epoxy coating creates a durable, chemical-resistant surface perfect for garages. The coating bonds directly to concrete, forming a protective layer that withstands heavy traffic and spills. Additionally, epoxy resists oil stains, making cleanup much easier than bare concrete.
Safety becomes crucial in garage environments. Water, oil, or snow tracked in from vehicles creates hazardous conditions on smooth surfaces. Therefore, anti slip additives provide essential traction without compromising the floor’s aesthetic appeal. These additives come in various forms, including aluminum oxide, polymer grit, and sand.
Selecting the Right Anti Slip Additive
Different additives offer varying levels of grip and appearance. Aluminum oxide provides excellent traction and durability. This material resists wear from vehicle tires and foot traffic. Moreover, it comes in multiple grit sizes, allowing you to customize the texture level.
Polymer grit offers a softer feel underfoot compared to aluminum oxide. This option works well for garages that double as workshops or hobby spaces. Clear polymer beads blend seamlessly with any epoxy color. However, they may wear faster than mineral-based alternatives.
Silica sand represents the most economical choice. This natural material provides good traction at a lower cost. Furthermore, sand mixes easily with epoxy and distributes evenly during application. The downside involves its tendency to settle during mixing, requiring frequent stirring.
Gathering Essential Materials and Tools
Proper preparation requires specific tools and materials. You will need epoxy coating, anti slip additive, concrete cleaner or degreaser, etching solution or grinder, paint roller with extension pole, mixing buckets, and protective equipment including gloves and respirator.
Additionally, gather painter’s tape, plastic sheeting, and a stiff-bristled broom. A leaf blower helps remove dust before coating. Therefore, having everything ready beforehand ensures smooth workflow and prevents delays during application.
Preparing Your Garage Floor
Surface preparation determines the success of your epoxy project. Start by removing everything from the garage. Clean the floor thoroughly using a concrete cleaner or degreaser. Pay special attention to oil stains, as these prevent proper epoxy adhesion.
Next, repair any cracks or damage in the concrete. Fill small cracks with concrete filler and allow proper curing time. Larger damage may require professional assessment. Subsequently, the floor needs profiling to help epoxy bond effectively.
Etching creates the necessary surface texture for adhesion. Mix etching solution according to manufacturer instructions and apply evenly across the floor. Alternatively, mechanical grinding provides more consistent results, especially for sealed or very smooth concrete. Rinse thoroughly after etching and allow the floor to dry completely, which typically takes 24 hours.
Mixing Epoxy with Anti Slip Additives
Timing matters when mixing epoxy and additives. First, read the manufacturer’s instructions carefully. Different products have specific pot life and working times. Generally, you should add anti slip material after combining the epoxy resin and hardener.
Mix the two-part epoxy thoroughly for the recommended duration, usually two to three minutes. Then, gradually add your chosen anti slip additive while continuing to stir. The typical ratio ranges from one-half to one pound of additive per gallon of mixed epoxy. However, adjust this amount based on desired traction level.
Stir the mixture continuously to prevent settling. Work in sections if covering a large area, mixing only what you can apply within the pot life. Therefore, having a helper speeds up the process and ensures consistent results.
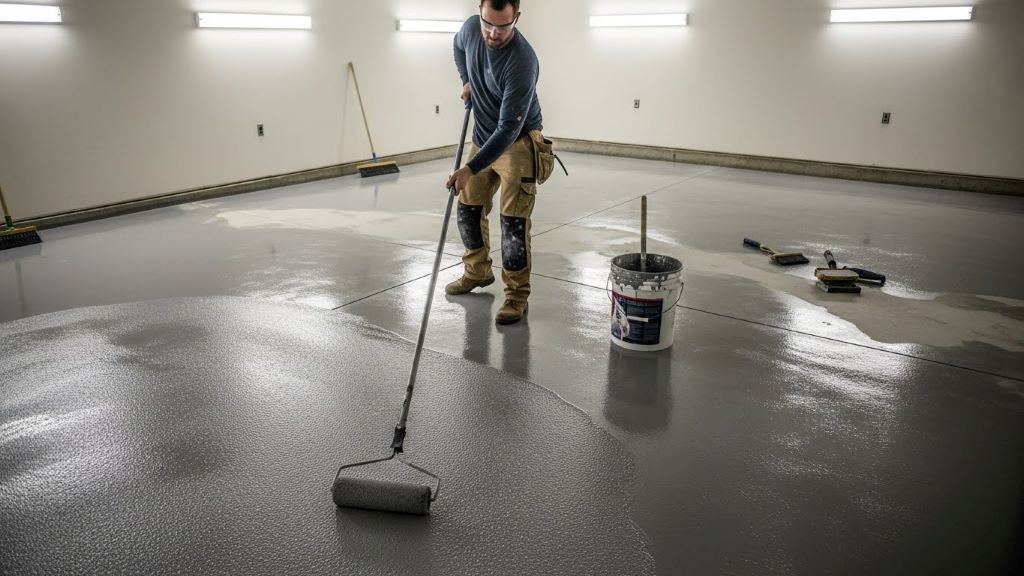
Applying the First Coat
Temperature and humidity affect epoxy application. Ideal conditions range from 60 to 90 degrees Fahrenheit with humidity below 85 percent. Start by cutting in along edges and corners using a brush. This creates clean lines and ensures complete coverage.
Pour the mixed epoxy onto the floor in manageable sections. Use a roller with a three-eighths-inch nap to spread the coating evenly. Work in overlapping W-patterns to avoid roller marks. Additionally, maintain a wet edge to prevent lap marks between sections.
Move systematically across the floor, working toward the exit. The first coat typically requires less additive than the final coat. This base layer provides adhesion and color while the topcoat delivers maximum slip resistance. Allow the first coat to cure according to product specifications, usually 12 to 24 hours.
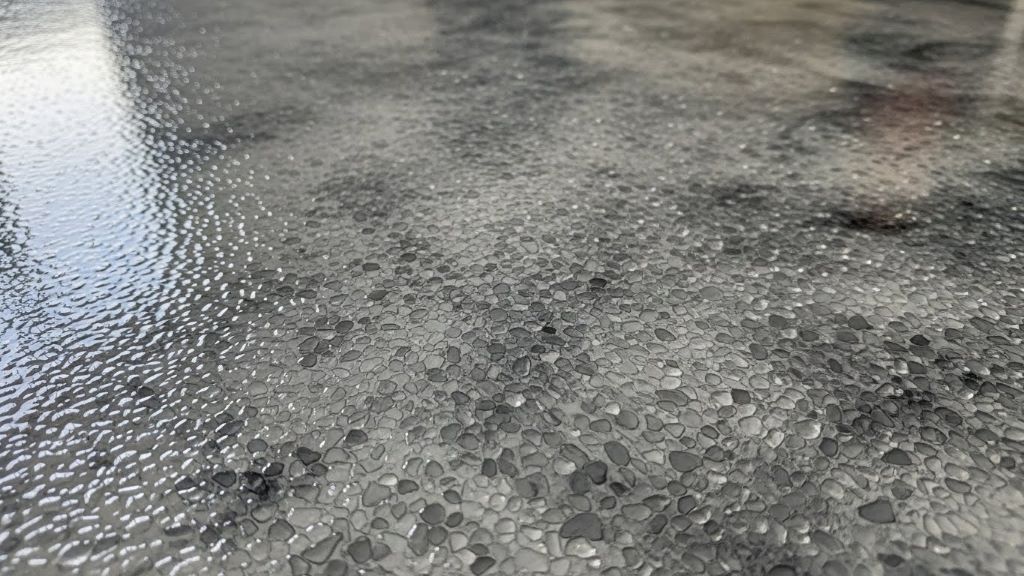
Applying the Topcoat with Maximum Grip
The second coat provides the primary slip resistance. Mix this batch with a slightly higher concentration of anti slip additive. Following the same application method as the first coat ensures consistency.
However, pay extra attention to achieving even additive distribution. Work quickly but carefully to prevent settling in the bucket. Some professionals prefer broadcasting additive onto wet epoxy rather than premixing. This technique allows precise control over texture but requires practice.
Apply the topcoat within the recoat window specified by the manufacturer. Missing this window may require additional surface preparation. Therefore, plan your timing carefully to maintain proper adhesion between layers.
Curing and Final Steps
Patience during curing prevents damage to your new floor. Light foot traffic becomes possible after 24 hours. However, wait at least 72 hours before parking vehicles on the surface. Full chemical cure takes seven days.
During this time, protect the floor from moisture and debris. Avoid placing heavy objects or dragging items across the surface. Additionally, maintain good ventilation to aid the curing process and dissipate fumes.
According to This Old House, proper curing significantly impacts the floor’s long-term durability and performance.
Maintenance and Long-Term Care
Maintaining your epoxy floor preserves its appearance and functionality. Sweep regularly to remove dirt and debris that could scratch the surface. Mop with mild detergent and warm water as needed. Avoid harsh chemicals that might damage the coating.
The anti slip texture requires occasional attention. Dirt accumulation in the textured surface reduces effectiveness. Therefore, periodic deep cleaning with a deck brush restores traction. Inspect the floor annually for wear or damage.
Minor touch-ups address small issues before they expand. Keep leftover epoxy and additive for repairs, though most properly installed floors last many years without intervention. Furthermore, placing mats at entry points reduces dirt tracking and extends floor life.
Common Mistakes to Avoid
Several errors can compromise your project. Inadequate surface preparation ranks as the most common mistake. Rushing this step leads to adhesion failure and peeling. Moreover, applying epoxy in poor weather conditions causes problems with curing and finish quality.
Using too much or too little additive creates issues. Excessive additive makes the surface rough and difficult to clean. Insufficient additive fails to provide adequate slip resistance. Therefore, follow recommended ratios and test on a small area first.
Mixing too much epoxy at once results in waste. The material begins hardening before you can apply it. Conversely, mixing too little creates visible seams between batches. Plan your sections carefully and work with a partner when possible.
Cost Considerations and Budget Planning
Epoxy garage floor projects vary in cost depending on several factors. DIY installation costs between three and twelve dollars per square foot, including materials and additives. Professional installation typically ranges from eight to twenty dollars per square foot.
Anti slip additives add minimal cost, usually five to fifteen dollars per pound. One pound treats approximately two gallons of epoxy. Therefore, a standard two-car garage requires two to four pounds of additive.
Quality materials cost more initially but provide better longevity. Cheap epoxy may yellow, peel, or wear quickly. According to Consumer Reports, investing in quality products saves money long-term through reduced maintenance and replacement costs.
Conclusion
Applying epoxy with anti slip additives creates a safe, attractive garage floor. The process requires careful preparation, proper mixing, and patient application. Choose additives based on your specific needs and follow manufacturer guidelines closely.
Success depends on surface preparation and attention to detail during application. Allow adequate curing time before using the floor. With proper installation and maintenance, your epoxy floor will provide years of reliable service.
The investment in time and materials pays dividends through improved safety and enhanced property value. Your garage becomes a functional space that resists stains, damage, and wear while providing essential traction in all conditions.
Frequently Asked Questions
How long does epoxy garage flooring with anti slip additives last?
Properly installed epoxy floors with anti slip additives typically last 10 to 20 years in residential garages. Durability depends on surface preparation quality, traffic levels, and maintenance practices. Commercial-grade products and professional installation extend lifespan further.
Can I add anti slip additives to any epoxy product?
Most epoxy products accept anti slip additives. However, always check manufacturer compatibility recommendations. Some specialty epoxies have specific additive requirements. Additionally, fast-setting formulas may not allow sufficient time for proper mixing and application.
How much texture will anti slip additives create?
Texture level depends on additive type, grit size, and concentration. Fine grit creates subtle texture barely visible to the eye. Coarse grit produces noticeable texture similar to sandpaper. Start with manufacturer recommendations and adjust based on preference and safety needs.
Is it better to mix additives in or broadcast them on top?
Mixing additives into epoxy provides even distribution and consistent texture. Broadcasting onto wet epoxy allows greater control over coverage density but requires practice. Most DIYers achieve better results with the premixing method. Professional installers often use broadcasting for custom texture patterns.
Can I apply epoxy with anti slip additives over existing garage floor coatings?
Epoxy adheres poorly to most existing coatings. Remove old paint, sealers, or previous epoxy before application. Test adhesion by attempting to scrape existing coating with a putty knife. If material lifts easily, complete removal is necessary. Grinding or chemical stripping prepares previously coated floors for epoxy application.
Related Topics: